Accessing the machines, intro
Alexandre Strube // Sabrina Benassou
June 24th, 2025
Communication:
Links for the complimentary parts of this course:
- Zoom
- Slack
- JSC Training Page
- Judoor project page invite
- This document: https://go.fzj.de/bringing-dl-workloads-to-jsc
- Our mailing list for AI news
- Survey at the end of the course
- Virtual Environment template
- SOURCE of the course/slides on Github
![]()
Goals for this course:
- Make sure you know how to access and use our machines 👩💻
- Put your data in way that supercomputer can use it fast 💨
- Distribute your ML workload 💪
- Important: This is NOT a basic AI
course 🙇♂️
- If you need one, check fast.ai
![]()
Team:


![]()
Schedule for day 1
| Time | Title |
|---|---|
| 13:00 - 13:15 | Welcome |
| 13:15 - 14:00 | Introduction |
| 14:00 - 14:15 | Coffee break |
| 14:16 - 14:30 | Judoor, Keys |
| 14:30 - 15:00 | SSH, Jupyter, VS Code |
| 15:00 - 15:15 | Coffee Break |
| 15:15 - 16:00 | Running services on the login and compute nodes |
| 16:00 - 16:15 | Coffee Break |
| 16:30 - 17:00 | Sync (everyone should be at the same point) |
Note
Please open this document on your own browser! We will need it for the exercises. https://go.fzj.de/bringing-dl-workloads-to-jsc

Jülich Supercomputers
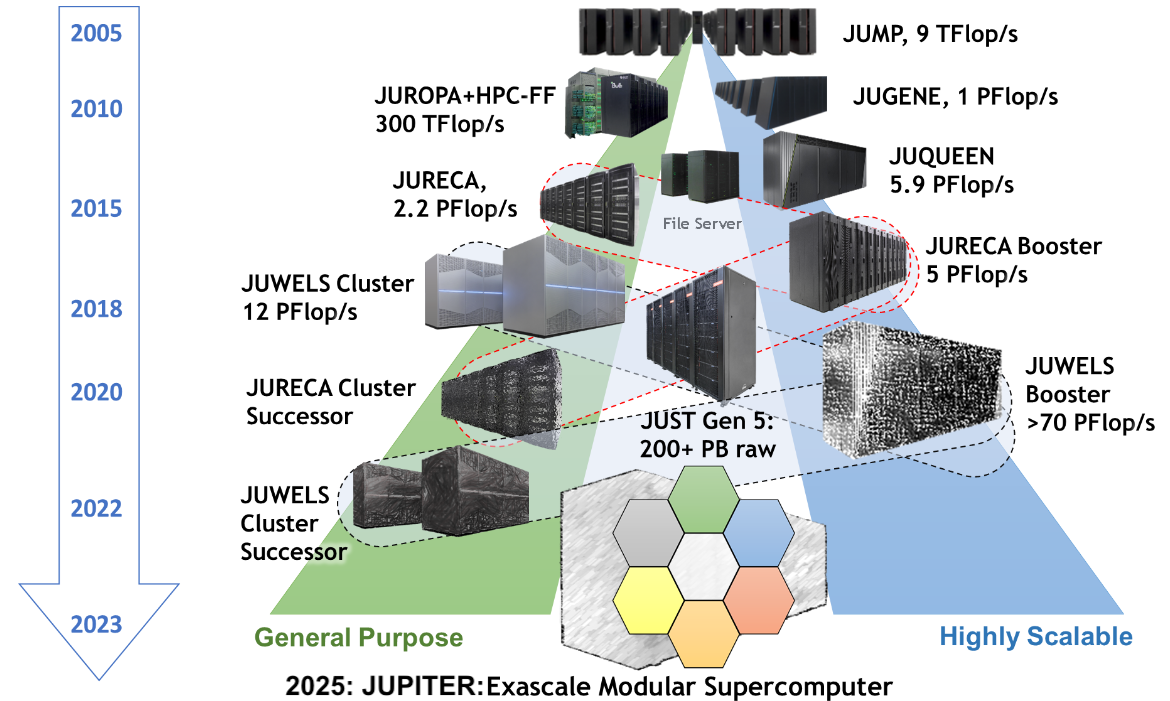
What is a supercomputer?
- Compute cluster: Many computers bound together locally
- Supercomputer: A damn lot of computers bound
together locally😒
- with a fancy network 🤯
Anatomy of a supercomputer
- Login Nodes: Normal machines, for compilation, data transfer, scripting, etc. No GPUs.
- Compute Nodes: Guess what?
- For compute! With GPUs! 🤩
- High-speed, ultra-low-latency network
- Shared networked file systems
- Some numbers we should (more or less) know about
them:
- Nodes
- Cores, Single-core Performance
- RAM
- Network: Bandwidth, Latency
- Accelerators (e.g. GPUs)
- GPU MEMORY
JURECA DC Compute Nodes
- 192 Accelerated Nodes (with GPUs)
- 2x AMD EPYC Rome 7742 CPU 2.25 GHz (128 cores/node)
- 512 GiB memory
- Network Mellanox HDR infiniband (FAST💨 and EXPENSIVE💸)
- 4x NVIDIA A100 with 40gb 😻
- TL;DR: 24576 cores, 768 GPUs 💪
- Way deeper technical info at Jureca DC Overview
How do I use a Supercomputer?
- Batch: For heavy compute, ML training
- Interactively: Jupyter
You don’t use the whole supercomputer
You submit jobs to a queue asking for resources

You don’t use the whole supercomputer
And get results back

You don’t use the whole supercomputer
You are just submitting jobs via the login node

You don’t use the whole supercomputer
You are just submitting jobs via the login node

You don’t use the whole supercomputer
You are just submitting jobs via the login node

You don’t use the whole supercomputer
- Your job(s) enter the queue, and wait for its turn
- When there are enough resources for that job, it runs

You don’t use the whole supercomputer
And get results back

Supercomputer Usage Model
- Using the the supercomputer means submitting a job to a batch system.
- No node-sharing. The smallest allocation for jobs is one compute node (4 GPUs).
- Maximum runtime of a job: 24h.
Recap:
- Login nodes are for submitting jobs, move files, compile, etc
- NOT FOR TRAINING NEURAL NETS
Recap:
- User submit jobs
- Job enters the queue
- When it can, it runs
- Sends results back to user
Connecting to Jureca DC
Getting compute time
- Go to https://go.fzj.de/bringing-dl-workloads-to-jsc-project-join
- Join the course project
training2529 - Sign the Usage Agreements (Video)
- Compute time allocation is based on compute projects. For every compute job, a compute project pays.
- Time is measured in core-hours. One hour of Jureca DC is 128 core-hours.
- Example: Job runs for 8 hours on 64 nodes of Jureca DC: 8 * 64 * 128 = 65536 core-h!
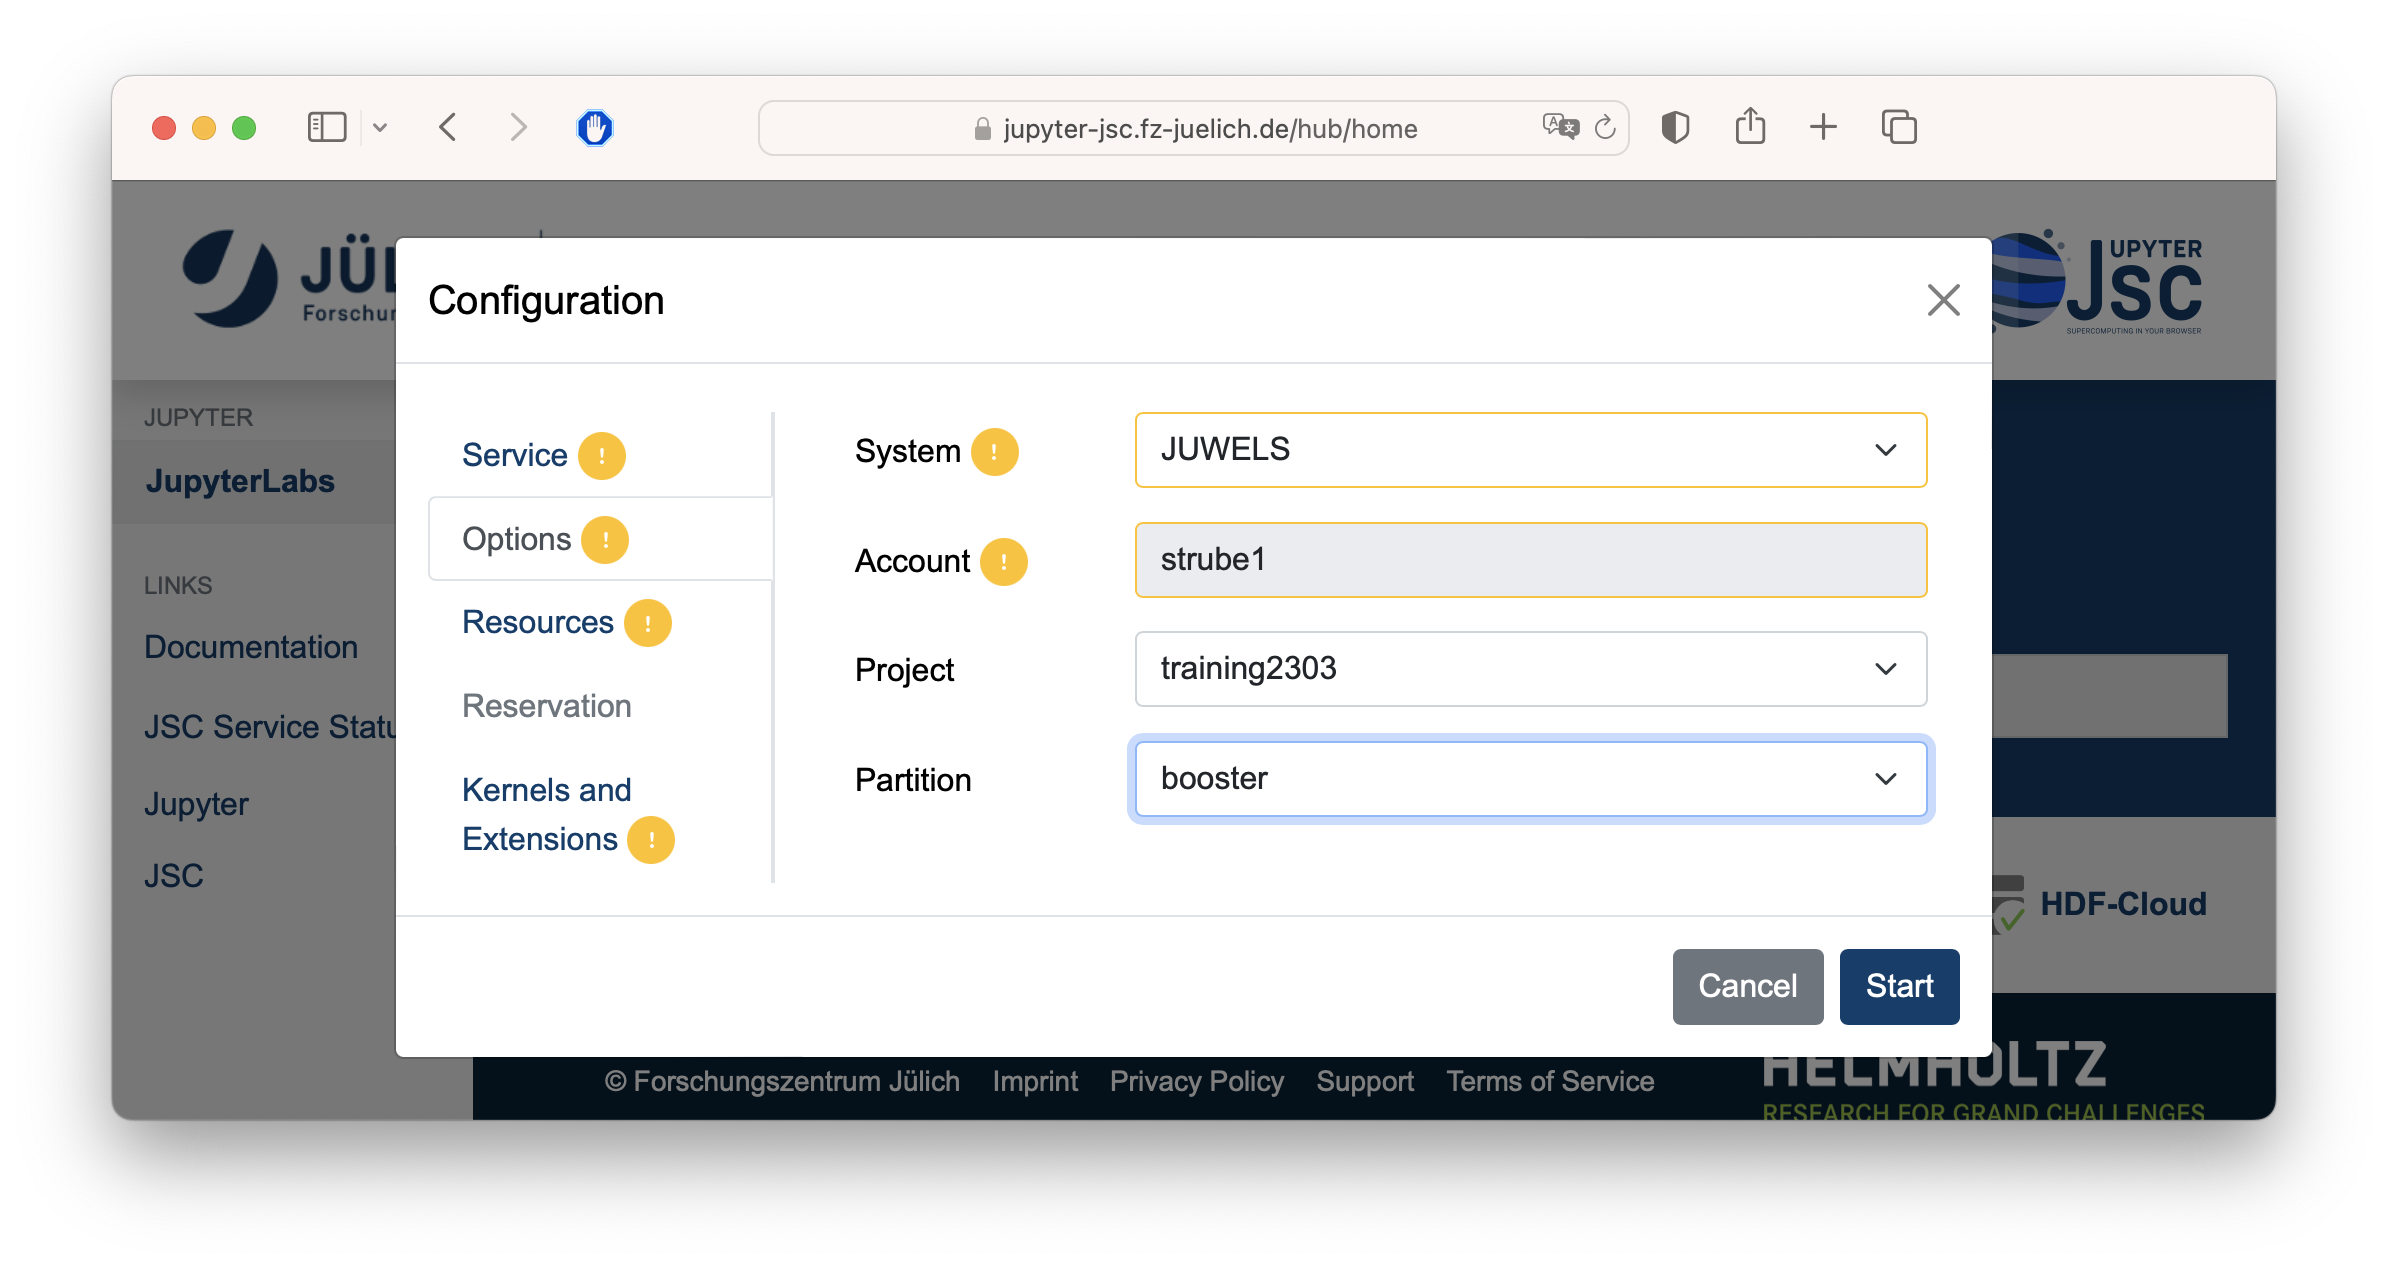
Jupyter
- Jupyter-JSC uses the queue
- When you are working on it, you are using project time ⌛️
- Yes, if you are just thinking and looking at the 📺, you are burning project time🤦♂️
- It’s useful for small tests - not for full-fledged development 🙄
Jupyter
Pay attention to the partition - DON’T RUN IT ON THE LOGIN NODE!!!
Connecting to Jureca DC
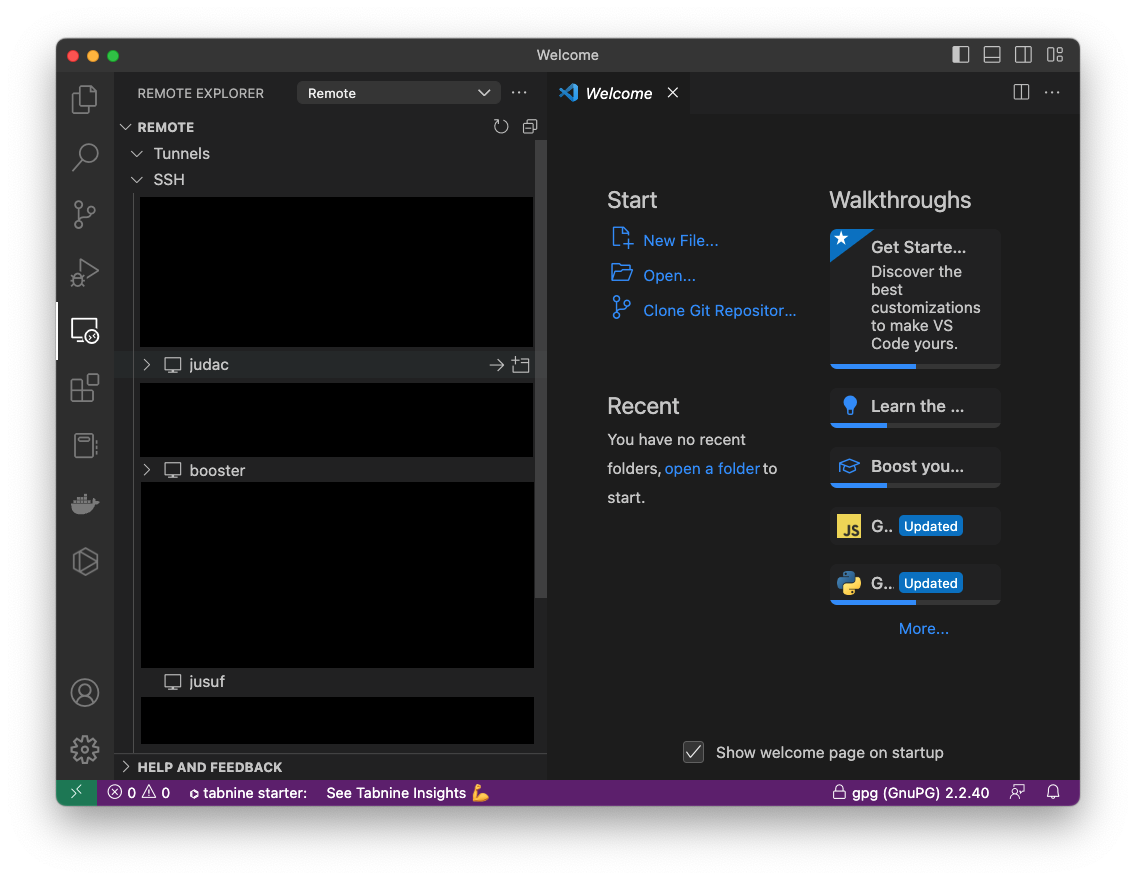
VSCode
- Download VScode: code.visualstudio.com
- Install and run it
- On the local terminal, type
code
- On the local terminal, type
- Install Remote Development Tools
- Install Remote: SSH
- If you have Windows, you need WSL as explained on the email.
VSCode
Now with the remote explorer tab

SSH
- SSH is a secure shell (terminal) connection to another computer
- You connect from your computer to the LOGIN NODE
- Security is given by public/private keys
- A connection to the supercomputer needs a
- Key,
- Configuration
- Key/IP address known to the supercomputer
SSH
Create key in VSCode’s Terminal (menu View->Terminal)
$ ssh-keygen -a 100 -t ed25519 -f ~/.ssh/id_ed25519-JSC
Generating public/private ed25519 key pair.
Enter passphrase (empty for no passphrase):
Enter same passphrase again:
Your identification has been saved in /Users/strube1/.ssh/id_ed25519-JSC
Your public key has been saved in /Users/strube1/.ssh/id_ed25519-JSC.pub
The key fingerprint is:
SHA256:EGNNC1NTaN8fHwpfuZRPa50qXHmGcQjxp0JuU0ZA86U strube1@Strube-16
The keys randomart image is:
+--[ED25519 256]--+
|      *++oo=o. . |
|     . =+o .= o  |
|      .... o.E..o|
|       .  +.+o+B.|
|        S  =o.o+B|
|          . o*.B+|
|          . . =  |
|           o .   |
|            .    |
+----[SHA256]-----+
SSH
Configure SSH session
Windows users, from Ubuntu WSL (Change username for your user on windows)
SSH
Configure SSH session
Host jureca
        HostName jureca.fz-juelich.de
        User [MY_USERNAME]   # Here goes your username, not the word MY_USERNAME.
        AddressFamily inet
        IdentityFile ~/.ssh/id_ed25519-JSC
        MACs hmac-sha2-512-etm@openssh.com
Copy contents to the config file and save it
REPLACE [MY_USERNAME] WITH YOUR USERNAME!!! 🤦♂️
SSH
JSC restricts from where you can login
So we need to:
- Find our ip range
- Add the range and key to Judoor
SSH
Find your ip/name range
SSH
Find your ip/name range

- Let’s keep this inside vscode:
code key.txtand paste the number you got
SSH
Did everyone get their own ip address?
SSH - EXAMPLE
- I will use the number
93.199.55.163 - YOUR NUMBER IS DIFFERENT
- Seriously
SSH - Example:
93.199.55.163
- Go to VSCode and make it simpler, replace the 2nd
half with
"0.0/16":- It was
93.199.55.163 - Becomes
93.199.0.0/16(with YOUR number, not with the example)
- It was
- Add a
from=""around it - So, it looks like this, now:
from="93.199.0.0/16" - Add a second magic number, with a comma:
,10.0.0.0/8🧙♀️ - I promise, the magic is worth it 🧝♂️ (If time allows)
- In the end it looks like this:
from="93.199.0.0/16,10.0.0.0/8"🎬 - Keep it open, we will use it later
- If you are from FZJ, also add “134.94.0.0/16” with a comma
SSH - Example:
93.199.0.0/16
Copy your ssh key
Terminal:
code ~/.ssh/id_ed25519-JSC.pubSomething like this will open:
ssh-ed25519 AAAAC3NzaC1lZDE1NTA4AAAAIHaoOJF3gqXd7CV6wncoob0DL2OJNfvjgnHLKEniHV6F strube@demonstration.fz-juelich.dePaste this line at the same
key.txtwhich you just opened
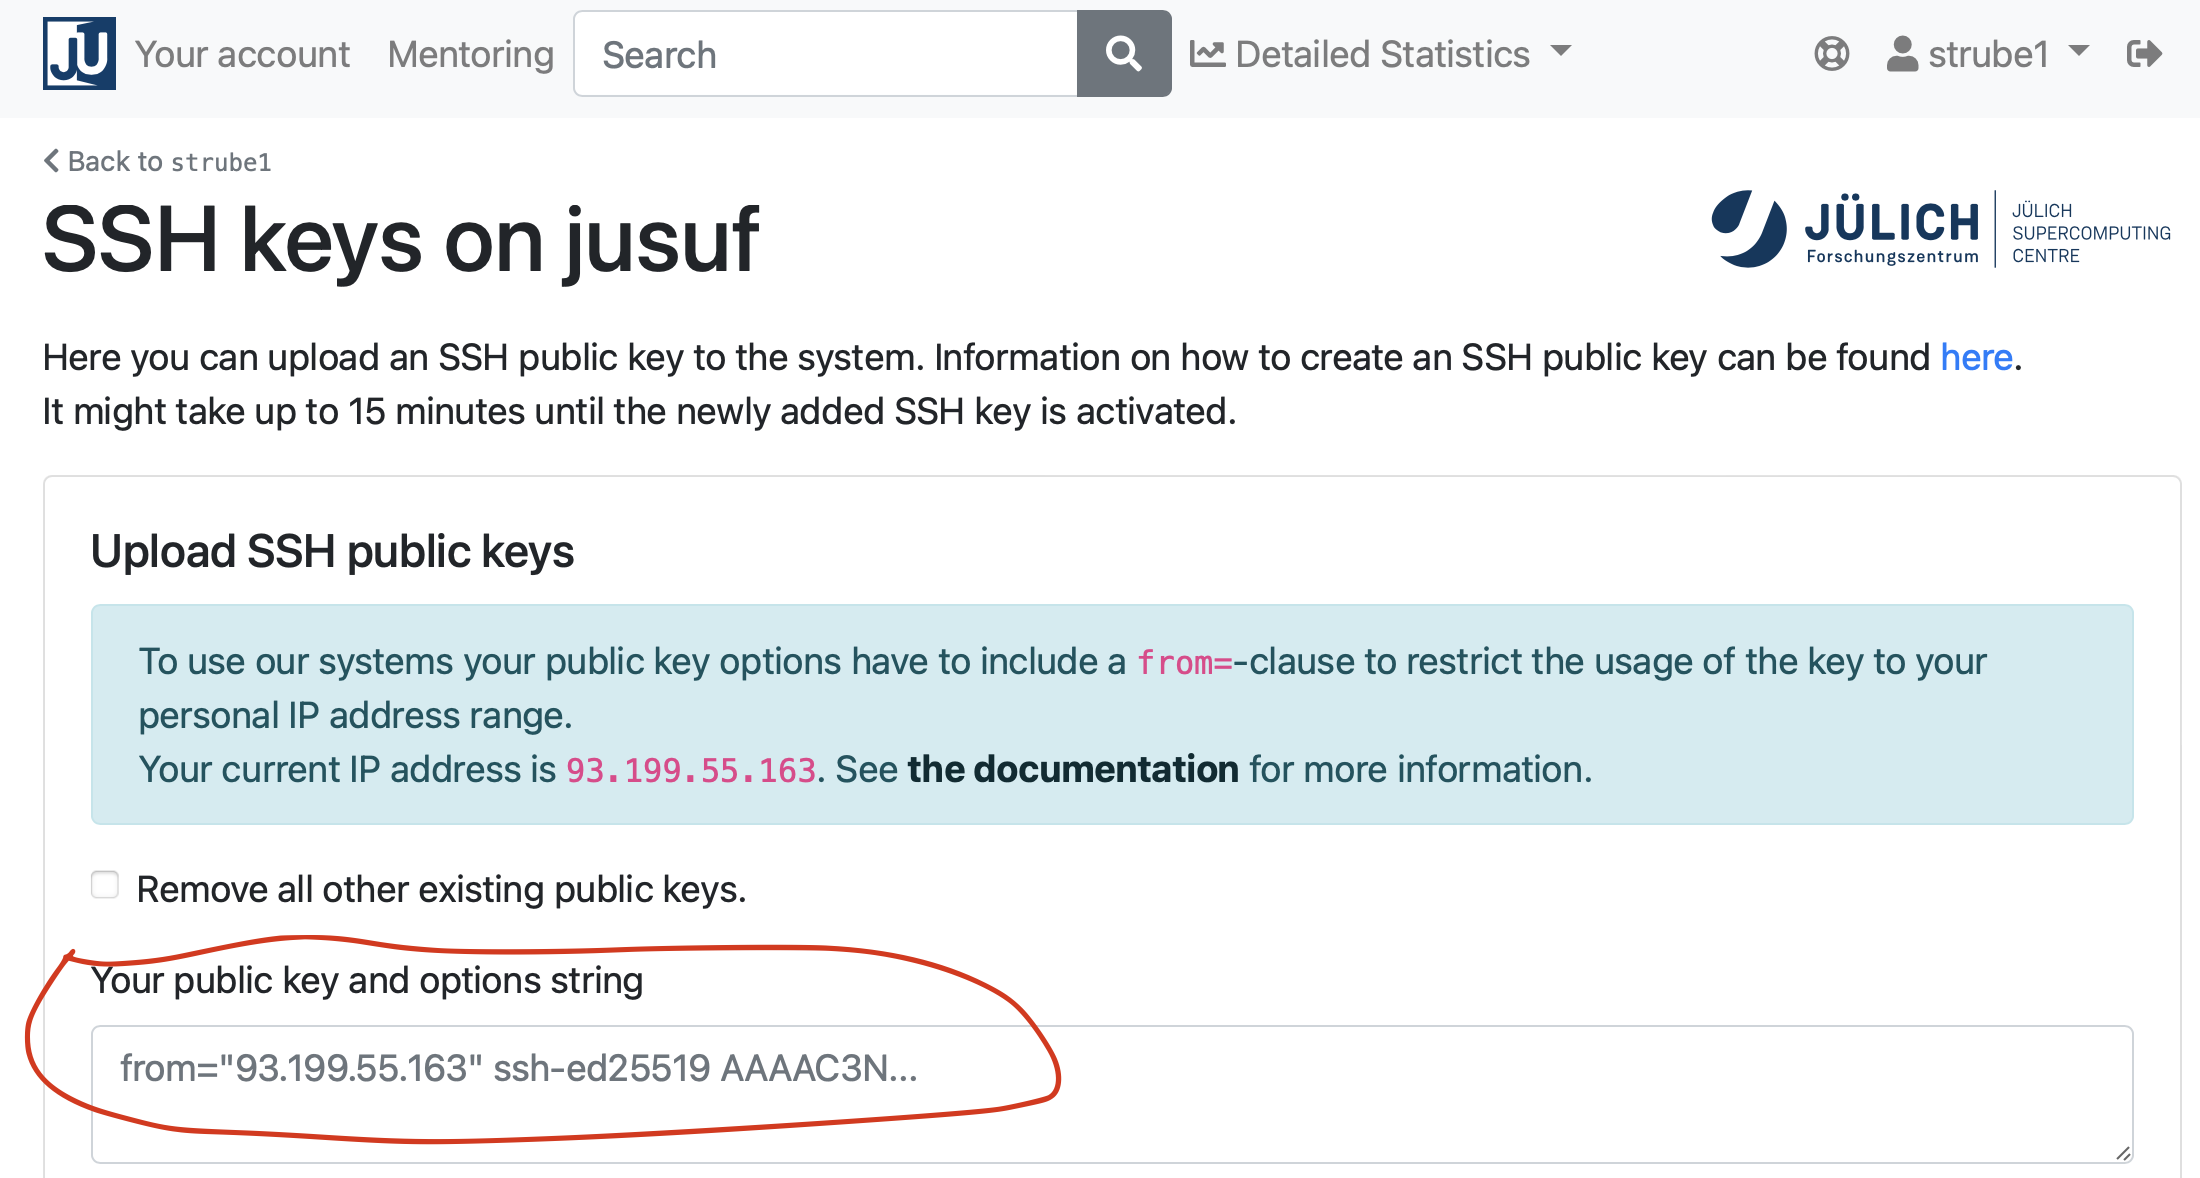
SSH
Example: 93.199.0.0/16
- Put them together and copy again:
from="93.199.0.0/16,10.0.0.0/8" ssh-ed25519 AAAAC3NzaC1lZDE1NTA4AAAAIHaoOJF3gqXd7CV6wncoob0DL2OJNfvjgnHLKEniHV6F strube@demonstration.fz-juelich.de
SSH
- Let’s add it on Judoor
![]()
- Do it for JURECA and JUDAC with the same key
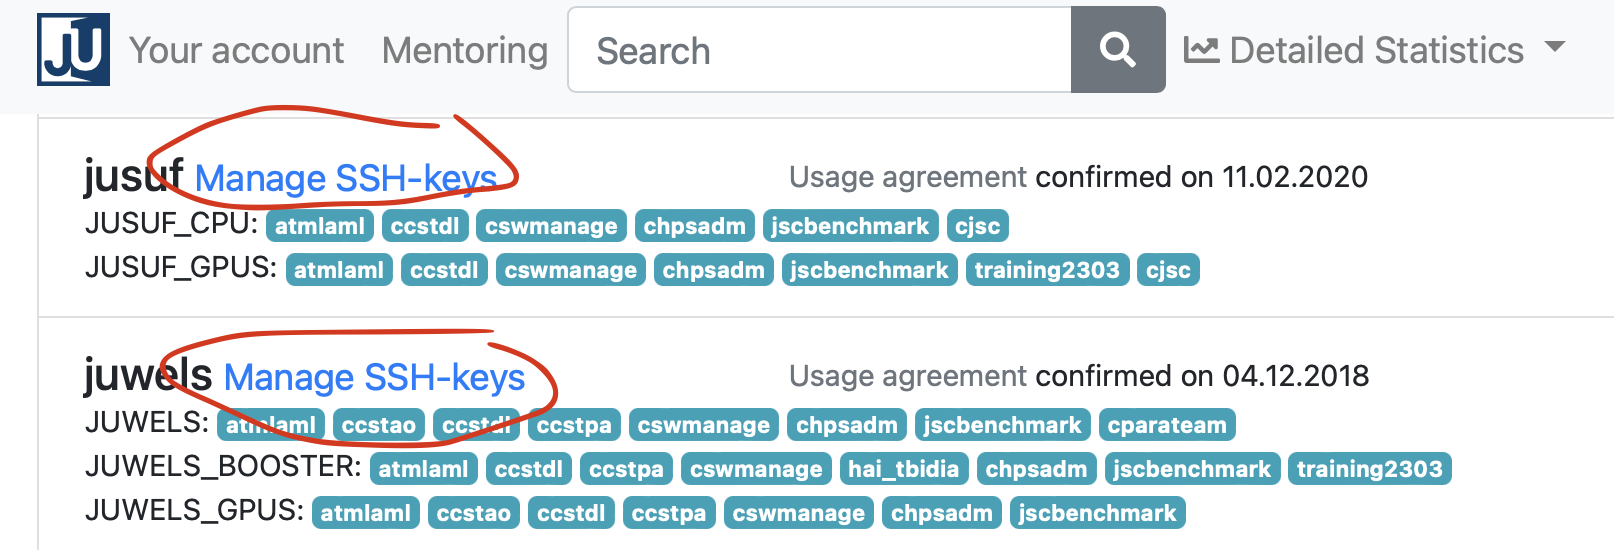
SSH
Add new key to Judoor
This might take some minutes
SSH: Exercise
That’s it! Give it a try (and answer yes)
$ ssh jureca
The authenticity of host 'jrlogin03.fz-juelich.de (134.94.0.185)' cannot be established.
ED25519 key fingerprint is SHA256:ASeu9MJbkFx3kL1FWrysz6+paaznGenChgEkUW8nRQU.
This key is not known by any other names
Are you sure you want to continue connecting (yes/no/[fingerprint])? Yes
**************************************************************************
*                            Welcome to Jureca DC                   *
**************************************************************************
...
...
strube1@jrlogin03~ $
SSH: Exercise
Make sure you are connected to the supercomputer
# Create a folder for myself
mkdir $PROJECT_training2529/$USER

# Create a shortcut for the project on the home folder
rm -rf ~/course ; ln -s $PROJECT_training2529/$USER ~/course

# Enter course folder and
cd ~/course

# Where am I?
pwd

# We well need those later
mkdir ~/course/.cache
mkdir ~/course/.config
mkdir ~/course/.fastai

rm -rf $HOME/.cache ; ln -s ~/course/.cache $HOME/
rm -rf $HOME/.config ; ln -s ~/course/.config $HOME/
rm -rf $HOME/.fastai ; ln -s ~/course/.fastai $HOME/
Working with the supercomputer’s software
- We have literally thousands of software packages, hand-compiled for the specifics of the supercomputer.
- Full list
- Detailed documentation
Software
Tool for finding
software: module spider
strube1$ module spider PyTorch
------------------------------------------------------------------------------------
  PyTorch:
------------------------------------------------------------------------------------
    Description:
      Tensors and Dynamic neural networks in Python with strong GPU acceleration.
      PyTorch is a deep learning framework that puts Python first.

     Versions:
        PyTorch/1.7.0-Python-3.8.5
        PyTorch/1.8.1-Python-3.8.5
        PyTorch/1.11-CUDA-11.5
        PyTorch/1.12.0-CUDA-11.7
     Other possible modules matches:
        PyTorch-Geometric  PyTorch-Lightning
...
What do we have?
module avail (Inside hierarchy)
Module hierarchy
Stage (full collection of software of a given year)
Compiler
MPI
Module
Eg:
module load Stages/2023 GCC OpenMPI PyTorch
What do I need to load such software?
module spider Software/version
Example: PyTorch
Search for the software itself - it will suggest a version
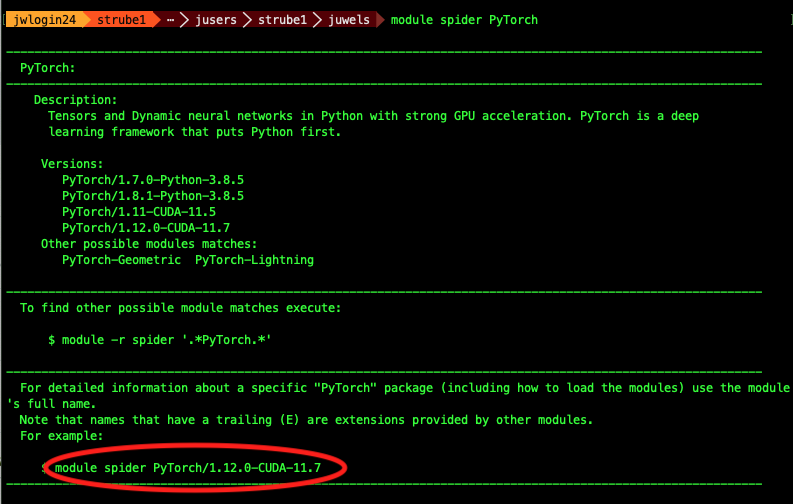
Example: PyTorch
Search with the version - it will suggest the hierarchy
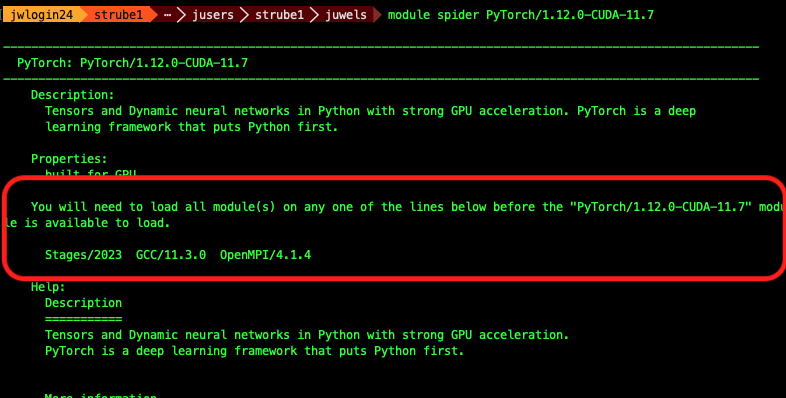
Example: PyTorch
(make sure you are still connected to Jureca DC)
$ python
Python 3.12.3 (main, Apr 15 2024, 18:07:06) [GCC 11.4.1 20231218 (Red Hat 11.4.1-3)] on linux
Type "help", "copyright", "credits" or "license" for more information.
>>> import torch
Traceback (most recent call last):
  File "<stdin>", line 1, in <module>
ModuleNotFoundError: No module named 'torch'
Oh noes! 🙈
Let’s bring Python together with PyTorch!
Example: PyTorch
Copy and paste these lines
# This command fails, as we have no proper pytorch
python -c "import torch ; print(torch.__version__)"
# So, we load the correct modules...
module load Stages/2025
module load GCC OpenMPI Python PyTorch
# And we run a small test: import pytorch and ask its version
python -c "import torch ; print(torch.__version__)"
Should look like this:
Python Modules
Some
of the python softwares are part of Python itself, or of other
softwares. Use “module key”
module key toml
The following modules match your search criteria: "toml"
------------------------------------------------------------------------------------

  Jupyter: Jupyter/2020.2.5-Python-3.8.5, Jupyter/2021.3.1-Python-3.8.5,
    Jupyter/2021.3.2-Python-3.8.5, Jupyter/2022.3.3, Jupyter/2022.3.4
    Project Jupyter exists to develop open-source software, open-standards,
    and services for interactive computing across dozens of programming languages.


  PyQuil: PyQuil/3.0.1
    PyQuil is a library for generating and executing Quil programs on the Rigetti
    Forest platform.

  Python: Python/3.8.5, Python/3.9.6, Python/3.10.4
    Python is a programming language that lets you work more quickly and integrate
    your systems more effectively.

------------------------------------------------------------------------------------
VSCode
Editing files on the supercomputers
VSCode
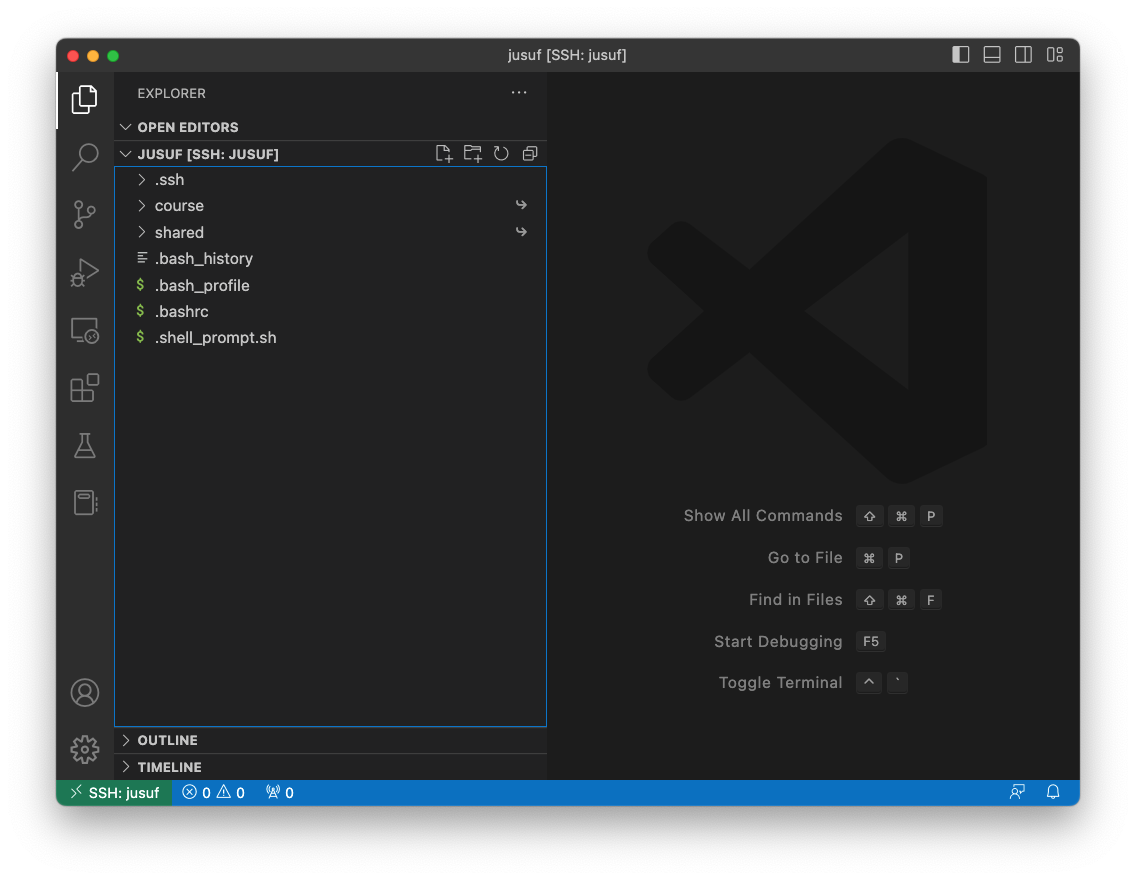
VSCode
- You can have a terminal inside VSCode:
- Go to the menu View->Terminal
VSCode
From the VSCode’s terminal, navigate to your “course” folder and to the name you created earlier.
- This is out working directory. We do everything here.
Demo code
Create a new
file “matrix.py” on VSCode on Jureca DC
Paste this into the file:
How to run it on the login node
module load Stages/2025
module load GCC OpenMPI Python PyTorch
python matrix.py
But that’s not what we want… 😒
So we send it to the queue!
HOW?🤔
SLURM 🤯

Simple Linux Utility for Resource Management
Slurm submission file
- Simple text file which describes what we want and how much of it, for how long, and what to do with the results
Slurm submission file example
code jureca-matrix.sbatch
#!/bin/bash
#SBATCH --account=training2529           # Who pays?
#SBATCH --nodes=1                        # How many compute nodes
#SBATCH --job-name=matrix-multiplication
#SBATCH --ntasks-per-node=1              # How many mpi processes/node
#SBATCH --cpus-per-task=1                # How many cpus per mpi proc
#SBATCH --output=output.%j        # Where to write results
#SBATCH --error=error.%j
#SBATCH --time=00:01:00          # For how long can it run?
#SBATCH --partition=dc-gpu         # Machine partition
#SBATCH --reservation=training2529 # For today only

module load Stages/2025
module load GCC OpenMPI PyTorch  # Load the correct modules on the compute node(s)

srun python matrix.py            # srun tells the supercomputer how to run it
Submitting a job: SBATCH
Are we there yet?

Are we there yet? 🐴
squeue --me
squeue --me
   JOBID  PARTITION    NAME      USER    ST       TIME  NODES NODELIST(REASON)
   412169 gpus         matrix-m  strube1 CF       0:02      1 jsfc013
ST is status:
- PD (pending),
- CF(configuring),
- R (running),
- CG (completing)
Reservations
- Some partitions have reservations, which means that only certain users can use them at certain times.
- For this course, it’s called
training2529
Job is wrong, need to cancel
Check logs
By now you should have output and error log files on your directory. Check them!
# Notice that this number is the job id. It's different for every job
cat output.412169
cat error.412169
Or simply open it on VSCode!
Extra software, modules and kernels
You want that extra
software from pip….
Example: Let’s install some software!
- Even though we have PyTorch, we don’t have PyTorch Lightning Flash
- Same for fast.ai and wandb
- We will install them in a virtual environment
Example: Let’s install some software!
Edit the file sc_venv_template/requirements.txt
Add these lines at the end:
# Add here the pip packages you would like to install on this virtual environment / kernel
pip
ipykernel
fastai
numba==0.60.0
numpy==1.26.4
scipy==1.13.1
matplotlib==3.9.2
scikit-learn==1.5.2
pandas==2.2.2
accelerate==1.1.1
pyarrow==18.1.0
transformers==4.46.3
sentencepiece==0.2.0
datasets==3.6.0
fsspec==2025.2.0.*
torch==2.5.1
torchrun_jsc>=0.0.15
Run on the terminal:
sc_venv_template/setup.sh
Example: Activating the virtual environment
Example: Activating the virtual environment
Let’s train a 🐈 classifier!
This is a minimal demo, to show some quirks of the supercomputer
code cats.pyfrom fastai.vision.all import *
from fastai.callback.tensorboard import *
#
print("Downloading dataset...")
path = untar_data(URLs.PETS)/'images'
print("Finished downloading dataset")
#
def is_cat(x): return x[0].isupper()
# Create the dataloaders and resize the images
dls = ImageDataLoaders.from_name_func(
path, get_image_files(path), valid_pct=0.2, seed=42,
label_func=is_cat, item_tfms=Resize(224))
print("On the login node, this will download resnet34")
learn = vision_learner(dls, resnet34, metrics=accuracy)
cbs=[SaveModelCallback(), TensorBoardCallback('runs', trace_model=True)]
# Trains the model for 6 epochs with this dataset
learn.unfreeze()
learn.fit_one_cycle(6, cbs=cbs)Submission file for the classifier
#!/bin/bash
#SBATCH --account=training2529
#SBATCH --mail-user=MYUSER@fz-juelich.de
#SBATCH --mail-type=ALL
#SBATCH --nodes=1
#SBATCH --job-name=cat-classifier
#SBATCH --ntasks-per-node=1
#SBATCH --cpus-per-task=128
#SBATCH --output=output.%j
#SBATCH --error=error.%j
#SBATCH --time=00:20:00
#SBATCH --partition=dc-gpu
#SBATCH --reservation=training2529 # For today only

cd $HOME/course/
source sc_venv_template/activate.sh # Now we finally use the fastai module

srun python cats.py
Submit it
Submission time
- Check error and output logs, check queue
Probably not much happening…
But it might fail
💥
What happened?
It might be that it’s not enough time for the job to give up
Check the error.${JOBID} file
If you run it longer, you will get the actual error:
🤔…
What is it doing?
This downloads the dataset:
And this one downloads the pre-trained weights:
Remember, remember
Remember, remember

Compute nodes have no internet connection
- But the login nodes do!
- So we download our dataset before…
- On the login nodes!
On the login node:
Comment out the line which does AI training:
Call our code on the login node!
Run the downloader on the login node
$ source sc_venv_template/activate.sh
$ python cats.py
Downloading dataset...
 |████████-------------------------------| 23.50% [190750720/811706944 00:08<00:26]
 Downloading: "https://download.pytorch.org/models/resnet34-b627a593.pth" to /p/project/ccstao/cstao05/.cache/torch/hub/checkpoints/resnet34-b627a593.pth
100%|█████████████████████████████████████| 83.3M/83.3M [00:00<00:00, 266MB/s]
Run it again on the compute nodes!
Un-comment back the line that does training:
Submit the job!
Masoquistically waiting for the job to run?
(To exit, type CTRL-C)
Check output files
You can see them within VSCode
The activation script must be sourced, otherwise the virtual environment will not work.
Setting vars
Downloading dataset...
Finished downloading dataset
epoch     train_loss  valid_loss  error_rate  time
Epoch 1/1 : |-----------------------------------| 0.00% [0/92 00:00<?]
Epoch 1/1 : |-----------------------------------| 2.17% [2/92 00:14<10:35 1.7452]
Epoch 1/1 : |█----------------------------------| 3.26% [3/92 00:14<07:01 1.6413]
Epoch 1/1 : |██---------------------------------| 5.43% [5/92 00:15<04:36 1.6057]
...
....
Epoch 1/1 :
epoch     train_loss  valid_loss  error_rate  time
0 0.049855 0.021369 0.007442 00:42 - 🎉
- 🥳
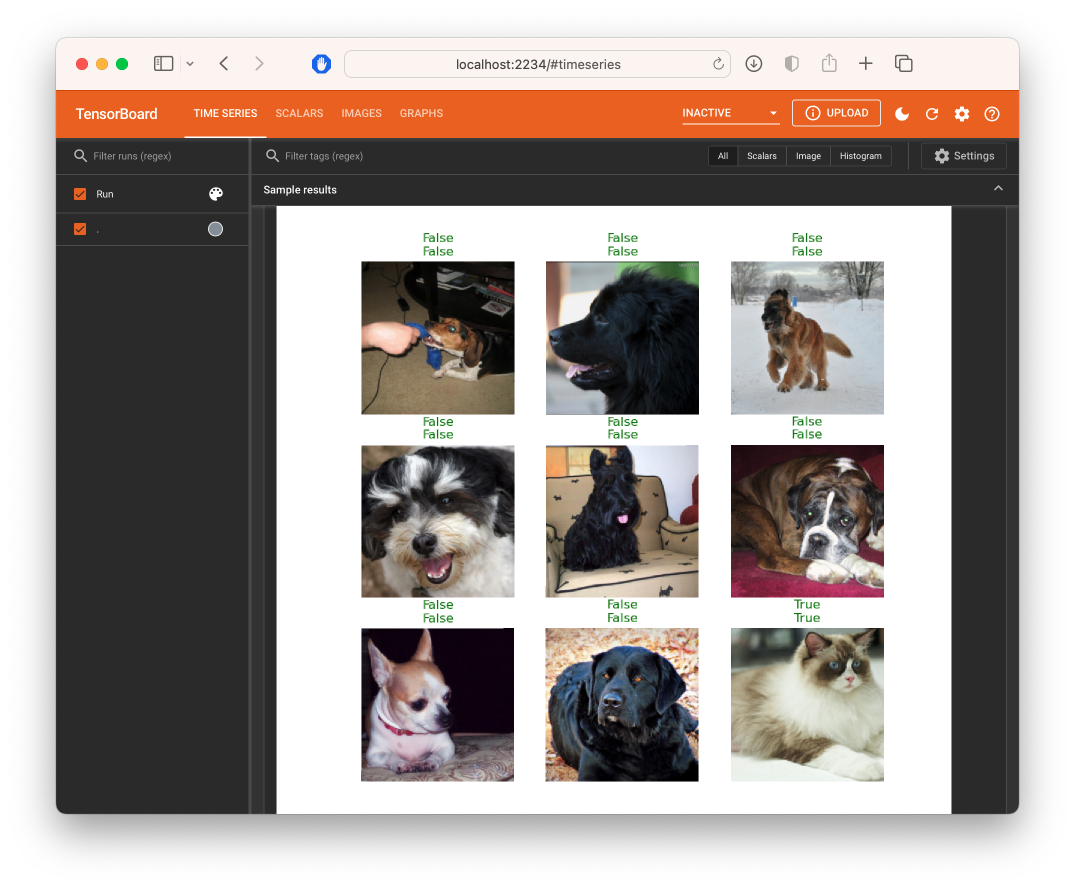
Tools for results analysis
We already ran the code and have results To analyze them, there’s a neat tool called Tensorboard And we already have the code for it on our example!
Example: Tensorboard
The command
- Opens a connection on port 9999… OF THE SUPERCOMPUTER.
- This port is behind the firewall. You can’t access it directly…
- We need to bypass the firewall 🏴☠️
- SSH PORT FORWARDING
Example: Tensorboard

Port Forwarding

Port forwarding demo:
On VSCode’s terminal:
- Note the tab
PORTSnext to the terminal - On the browser: http://localhost:12345
Tensorboard on Jureca DC
Day 1 recap
As of now, I expect you managed to:
- Stay awake for the most part of this morning 😴
- Have your own ssh keys 🗝️🔐
- A working ssh connection to the supercomputers 🖥️
- Can edit and transfer files via VSCode 📝
- Submit jobs and read results 📫
- Access web services on the login nodes 🧙♀️
- Is ready to make great code! 💪
ANY QUESTIONS??
Feedback is more than welcome!
Helmholtz Blablador

Blablador
- Blablador is our Large Language Model inference server (eg. ChatGPT)
- It’s a service for the Helmholtz Association.
- It’s fast, free and PRIVATE - I don’t record your conversations!
- Anyone here can use it
Blablador

VScode + Continue.dev
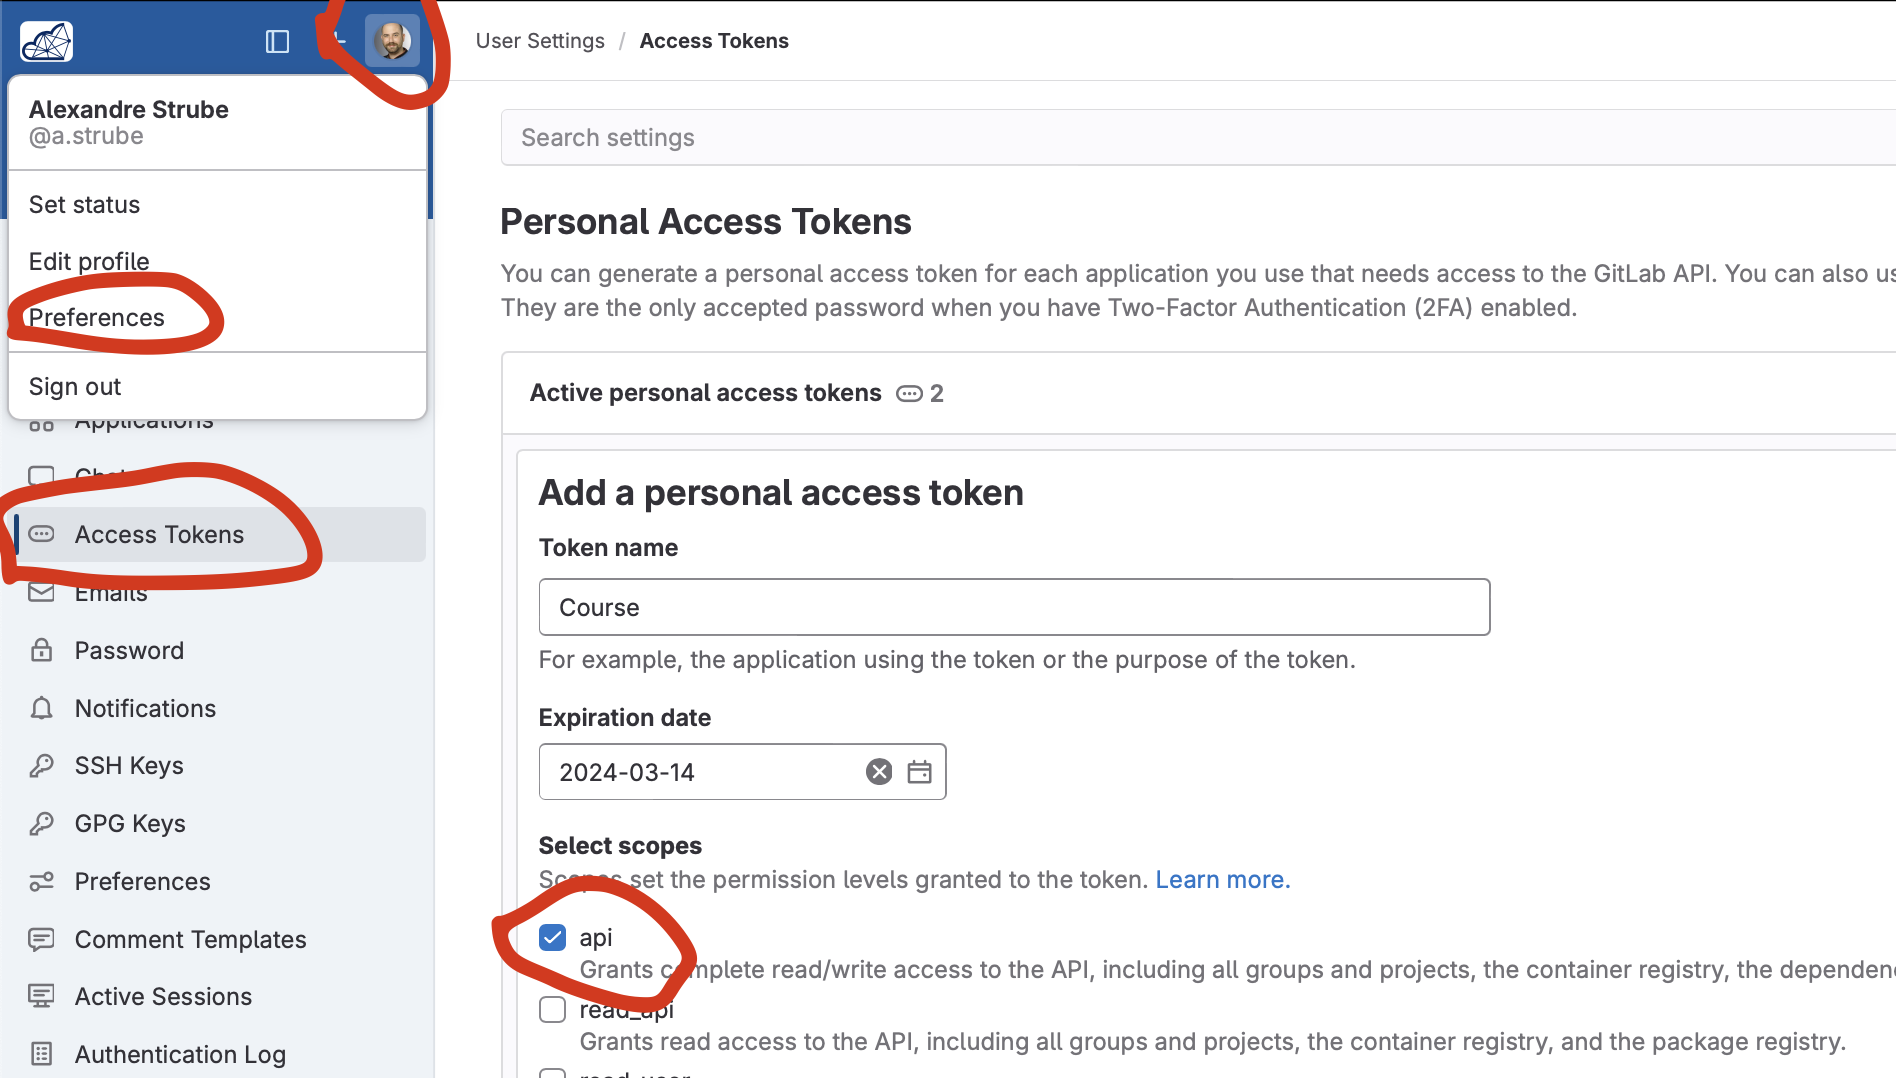
Obtaining a token
- Go to helmholtz codebase at http://codebase.helmholtz.cloud
- Log in with your email
- On the left side, click on your profile, and then on “Preferences”
- On “Access tokens”, click “Add new token”,
- give it a name,
- put an expiration date (max 1 year)
- and choose “api” in the “scopes” section
- Click “Create Personal Access Token”
- You will see a “………………………..” - copy this and save somewhere.
Blablador
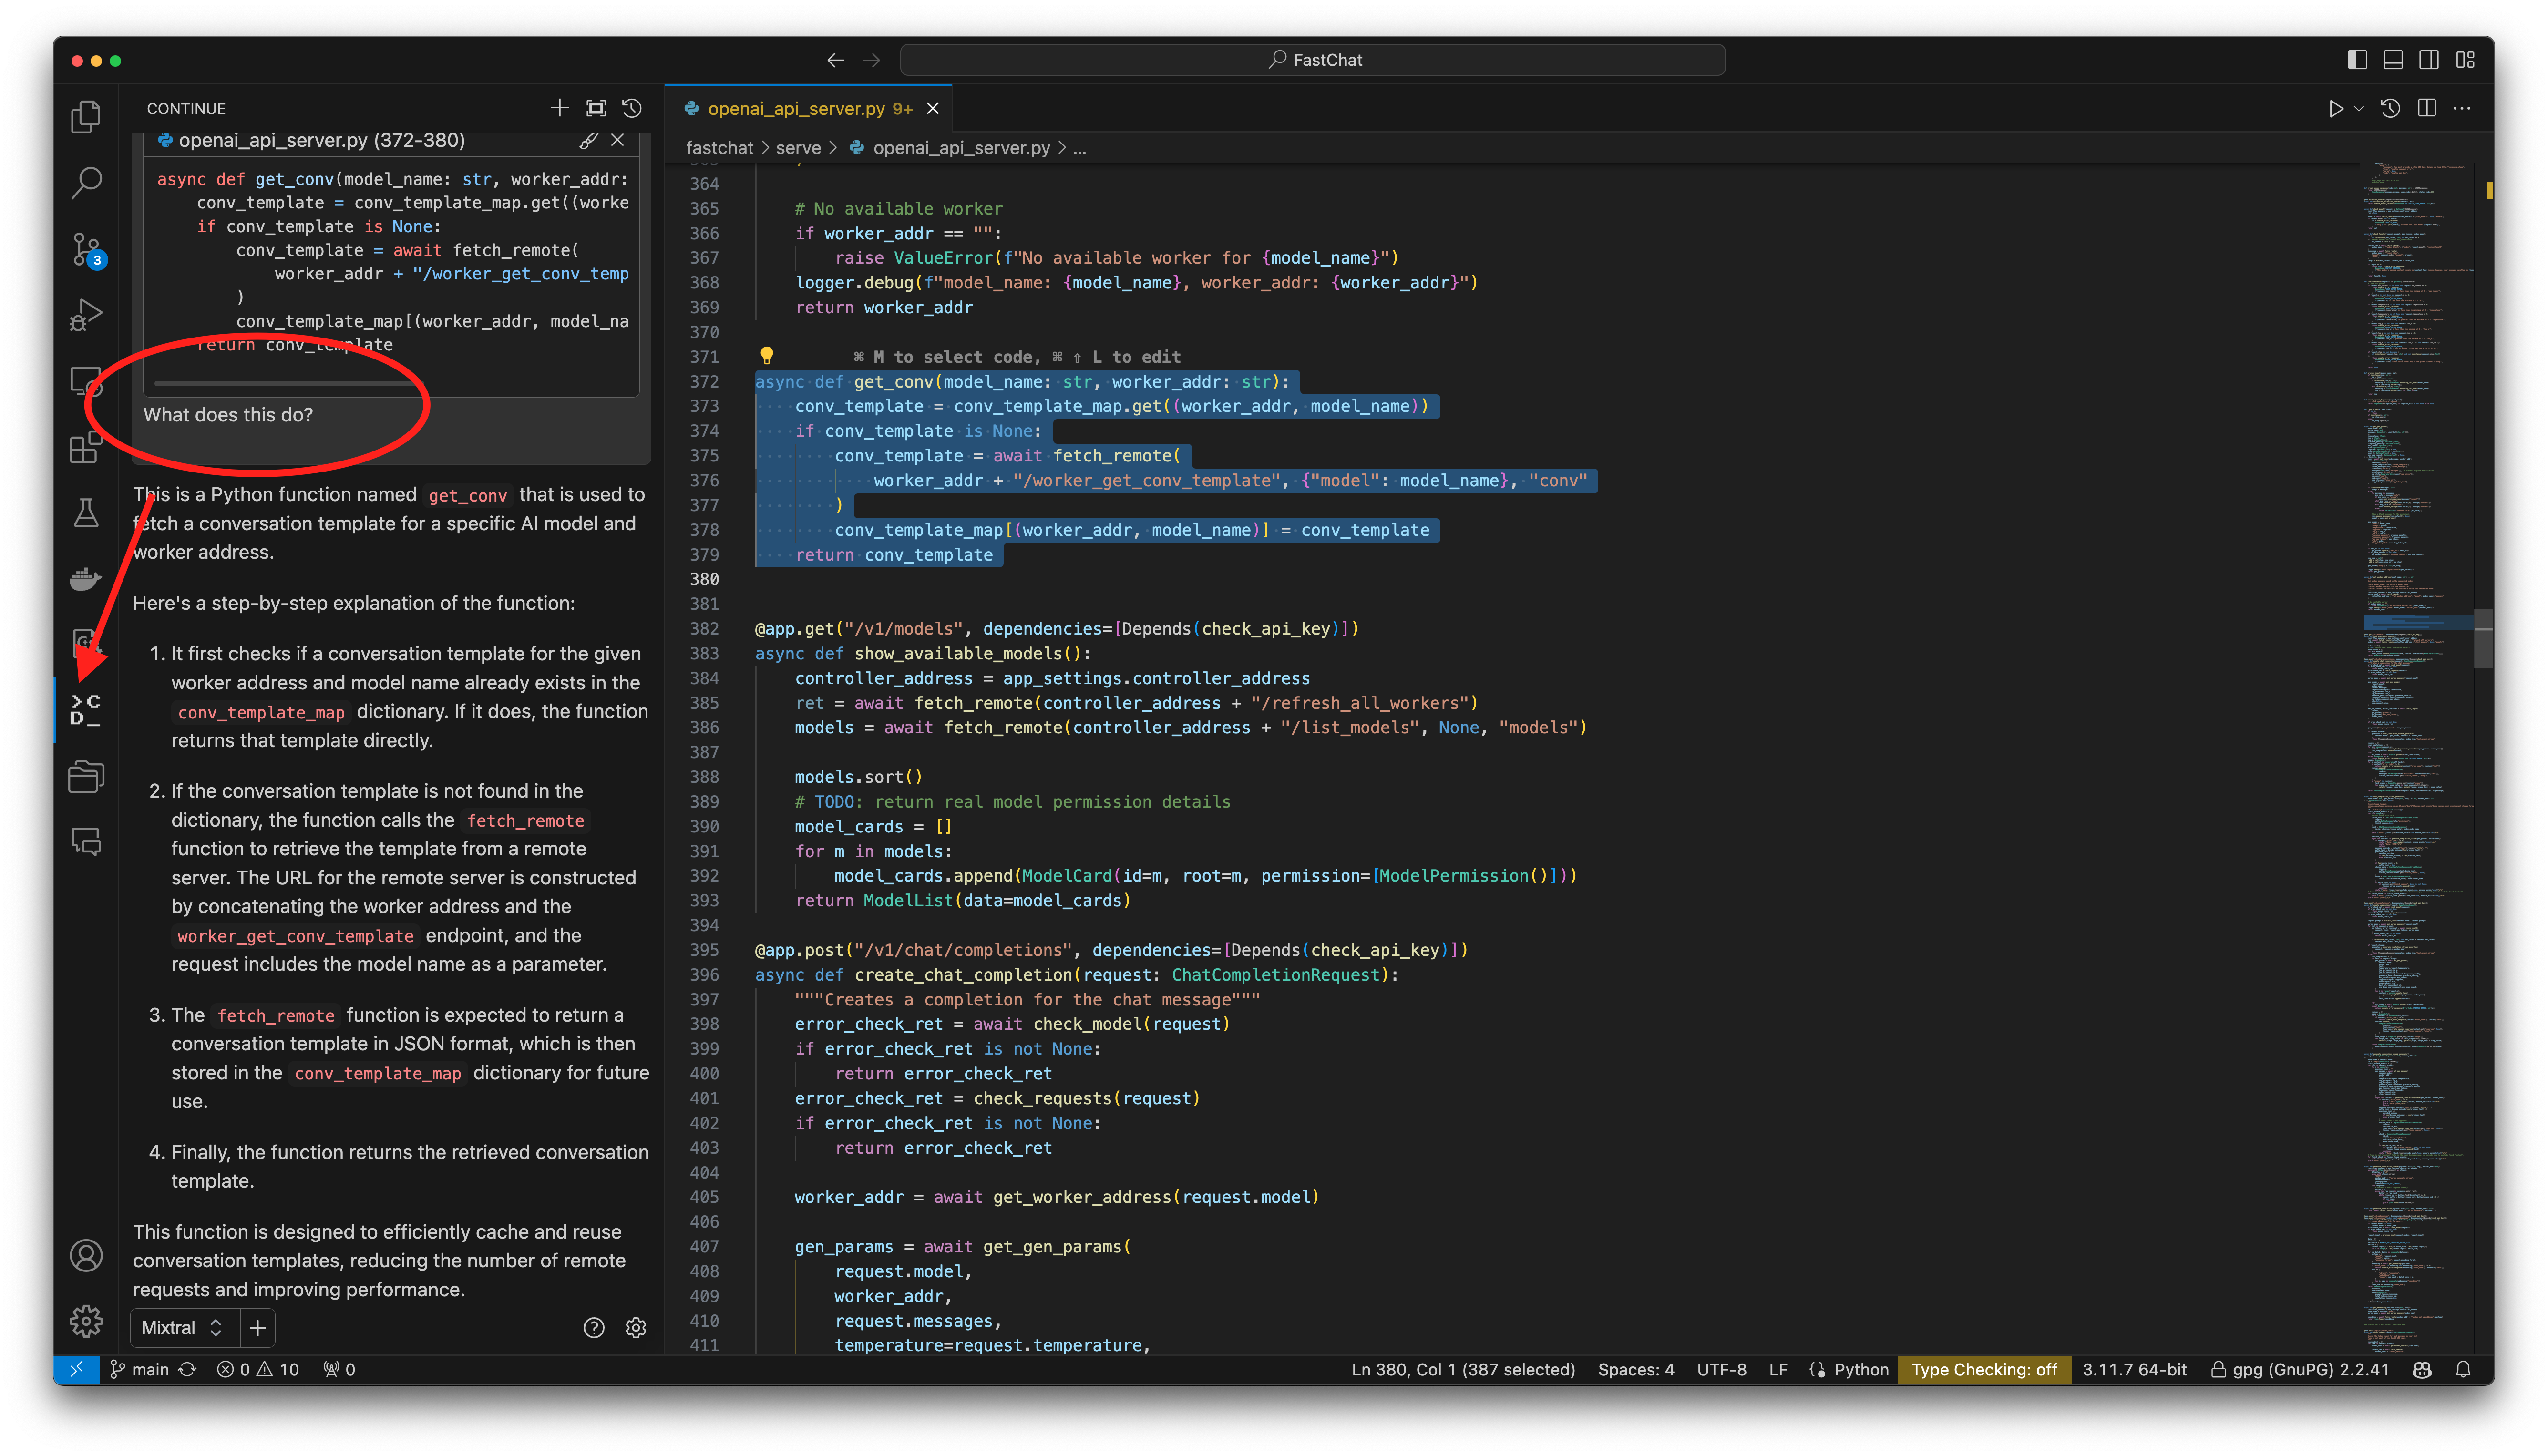
Blablador on VSCode!
- Add continue.dev extension to VSCode
- On Continue, choose to add model, choose Other OpenAI-compatible API
- Click in Open Config.json at the end
Blablador: VScode + Continue.dev
Inside config.json, add at the "models" section:
    {
      "model": "AUTODETECT",
      "title": "Blablador",
      "apiKey": "ADD_BLABLADOR_TOKEN_HERE",
      "apiBase": "https://api.helmholtz-blablador.fz-juelich.de/v1",
      "provider": "openai"
},- REPLACE THE APIKEY WITH YOUR OWN TOKEN!!!!
Blablador on VSCode
- Click on the “Continue.dev extension on the left side of VSCode.
- Select some code from our exercises, select it and send it to continue with cmd-shift-L (or ctrl-shift-L)
- Ask it to add unit tests, for example.
Backup slides
There’s more!
- Remember the magic? 🧙♂️
- Let’s use it now to access the compute nodes directly!
Proxy Jump
Accessing compute nodes directly
- If we need to access some ports on the compute nodes
![]()

Proxy Jump - SSH Configuration
Type on your machine “code $HOME/.ssh/config” and paste
this at the end:
# -- Compute Nodes --
Host *.jureca
        User [ADD YOUR USERNAME HERE]
        StrictHostKeyChecking no
        IdentityFile ~/.ssh/id_ed25519-JSC
        ProxyJump jureca
Proxy Jump: Connecting to a node
Example: A service provides web interface on port 9999
On the supercomputer:
srun --time=00:05:00 \
     --nodes=1 --ntasks=1 \
     --partition=dc-gpu \
     --account training2529 \
     --cpu_bind=none \
     --pty /bin/bash -i

bash-4.4$ hostname # This is running on a compute node of the supercomputer
jwb0002

bash-4.4$ cd $HOME/course/
bash-4.4$ source sc_venv_template/activate.sh
bash-4.4$ tensorboard --logdir=runs  --port=9999 serve
Proxy Jump
On your machine:
Mind the
iletter I added at the end of the hostnameNow you can access the service on your local browser at http://localhost:3334